Understanding Modern Environment Management
How Pixi addresses common research and AI computing challenges
Bioinformatics Manager
Center for Quantitative Life Sciences, Oregon State University
2025-11-12
Who We Are
The Center for Quantitative Life Sciences
- Facilitate genome-enabled and data-driven research
- Offer scientific leadership, training and services through expert staff
- We maintain and provide:
- Core laboratory services and instrumentation
- Computational resources
- Seminars, technology workshops, and conferences
- A focal point for researchers to establish contacts and initiate collaborations
What We’ll Cover
- The Reproducibility Challenge
- A quick look at environment issues in computational research.
- Introducing Pixi
- How Pixi’s design provides a modern solution.
- Four Real-World Use Cases
- Manuscript Figures: Ensuring long-term reproducibility for publications.
- HPC Benchmarking: Managing complex, multi-environment projects.
- AI Model Serving: Handling GPU and PyPI dependencies with vLLM.
- RAG Pipeline Development: Integrating Pixi into Python application development.
- Adoption & Best Practices
- How to get started in your own lab or research group.
The Conda Ecosystem
A Quick Primer: The Conda Ecosystem
To understand the problem, let’s define the key terms
What is conda?
An open-source system for managing packages and environments. It isolates project software to prevent conflicts, like creating a separate, clean workspace for each analysis.
What are Packages?
Bundles of software. conda installs pre-compiled binaries, which is much easier than compiling from source. Examples: python, numpy, samtools.
What are Channels?
The repositories where packages are stored. You tell conda which channels to search.
conda-forge: A massive, community-led collection of packages (most common).bioconda: A specialized channel for bioinformatics software.
Why Environment Management Matters
In computational research, software environments are a foundation of reproducible science.
Common scenarios we encounter:
- A graduate student’s analysis works on their laptop but fails on the cluster.
- Collaborators can’t reproduce results due to different package versions.
- Installing GPU-accelerated tools requires navigating complex dependency chains.
The Impact on Research
Prior to implementing pixi-based environments, conda package issues routinely hindered research projects on our infrastructure.
The underlying issue: Traditional tools, while powerful, present challenges for researchers whose focus should be on science, not system administration.
Challenges with the Traditional Conda Workflow
Conda has been a de facto standard, but researchers face several hurdles:
- The installation and activation process can be opaque for naive users.
- Installation and solver operations can take up to tens of minutes (or never finish).
- Mixing conda and pip packages can lead to subtle dependency conflicts.
environment.ymlfiles do not guarantee true reproducibility across time or platforms due to differences in package availability at install time.
This points to a need for tools that prioritize speed, reliability, and guaranteed reproducibility.
How Pixi Resolves Limitations of Conda
Pixi’s Architectural Approach
Pixi represents a new generation of environment tools designed with research workflows in mind.
Core architecture:
- Project-centric design: The environment specification lives with the project code.
- Deterministic resolution: Lock files (
pixi.lock) ensure identical environments. - Cross-platform by default: A single lock file can work for Linux, macOS, and Windows (if dependencies are available).
A Measurable Performance Difference
Pixi’s Rust-based solver offers a significant performance increase over both conda and mamba, often turning minutes of waiting into seconds.
Example Implementation
Let’s establish a computational biology project with common tools.
Adding software from conda-forge and bioconda:
Adding PyPI packages when needed:
What’s Happening Under the Hood
Pixi is resolving dependencies across conda-forge, bioconda, and PyPI into a single, consistent lock file. The --pypi flag tells it to source from PyPI directly.
You can then use pixi shell to enter the environment, or use pixi run (optionally with tasks, see later) to run commands in the environment.
Project Structure and Reproducibility
Track your project and its dependencies with git:
File organization created by Pixi:
genomics-analysis/
├── pixi.toml          # Human-readable project specification
├── pixi.lock          # Machine-generated, exact dependency versions
├── .gitattributes     # Ensures correct diffs for the lock file
├── .gitignore         # .pixi directory is ignored by default
└── .pixi/             # Local environment (not version controlled)
Pixi’s Reproducibility Advantage
The pixi.lock file is what makes this work. It contains exact versions and file hashes, guaranteeing that pixi install creates an identical environment, every time.
Defining Workflow Tasks
Add task definitions to pixi.toml for automation:
Running tasks is now simple and declarative:
These tasks can easily integrate with queuing systems such as Slurm, as the tasks will run using dependencies from within the environment. No Conda activation needed within your Slurm scripts.
Lab Management Tip
Tasks serve as executable documentation, making it easy for lab members to run complex workflows without remembering command-line arguments.
Addressing GPU Computing Challenges
Finding the right CUDA-capable software package can be difficult and time-consuming.
- Package version bumps can sometimes cause incompatibilites for an entire software stack.
- Navigating PyTorch/TensorFlow and CUDA compatibility.1
- Manually specifying CUDA-enabled package variants.
Pixi can simplify your approach:
[system-requirements]
cuda = "12.0"  # Set cuda to major cuda version

[dependencies]
cuda-version = "12.6.*"  # Restrict to a specific cuda version in dependencies
pytorch-gpu = "*"  # The conda-forge package handles the rest (recommended)
[pypi-dependencies]  # Alternative if conda-forge package doesn't work
torch = { version = "*", index = "https://download.pytorch.org/whl/cu124" }Working with the Software Ecosystem
Pixi is designed to intelligently navigate the existing world of Conda and PyPI packages.
Dependency Resolution Strategy:
- Conda-First Approach: Pixi prioritizes robust, pre-compiled packages from channels like
conda-forgeandbioconda. - Seamless PyPI Integration: It then resolves PyPI packages, creating a single, unified lock file for the entire environment.
- Performance: The underlying tooling is built in Rust for modern speed and reliability.
Managing Your Personal Toolkit:
For tools you use across all projects, use pixi global.
Real World Example #1 - Manuscript Figures
The Scenario: From Analysis to Publication
The pressure to “just get it done” often pushes good software practices to the back burner.
The common, painful workflow:
- Complete the analysis and generate figures.
- Scramble to package code and document software versions for the paper.
- Hope that it’s enough for others to reproduce your work.
This last-minute rush leads to incomplete and fragile reproducibility.
An Integrated Approach to Reproducibility
Pixi makes reproducibility an integral part of the research process from the start.
Unify Code & Environment:
pixiconfiguration lives alongside your analysis scripts ingit. The environment is the project.Eliminate Environment Drift: The
pixi.lockfile guarantees an identical software environment for anyone, anytime, on any machine.Publish with Confidence: Your project is a “publication-ready” reproducible artifact from day one. Archive on a service like Zenodo to make it citable and verifiable.
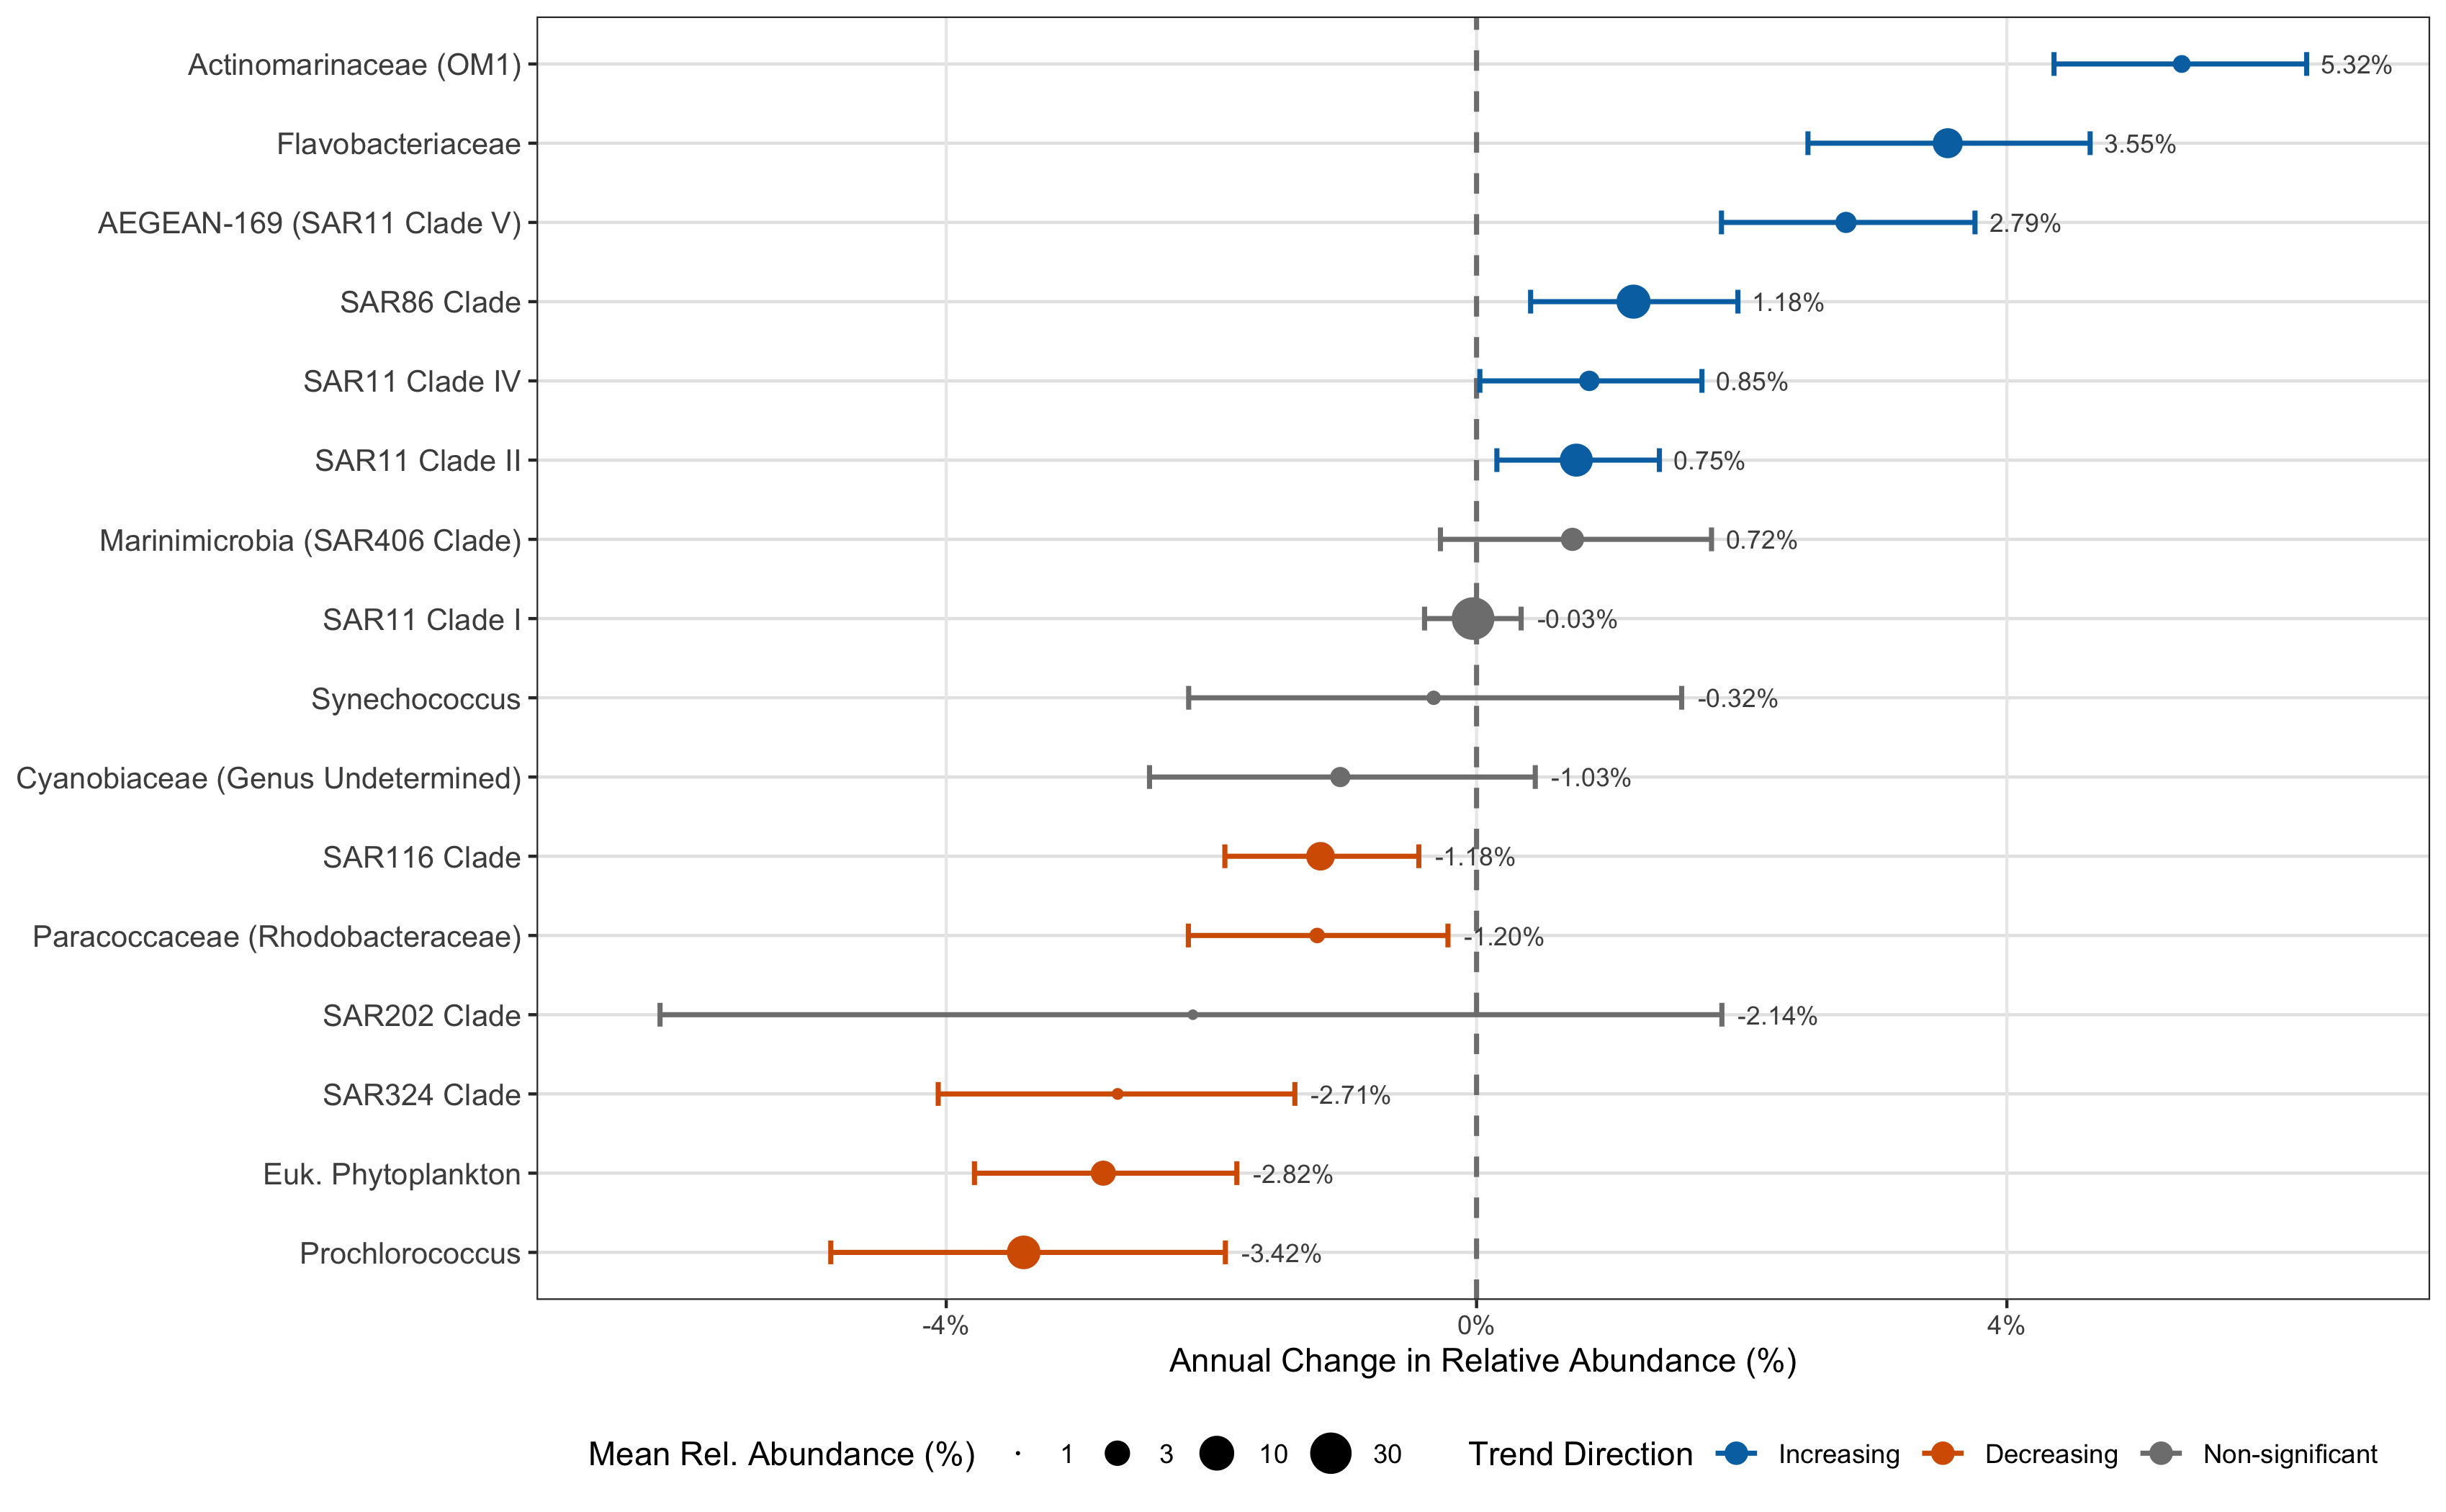
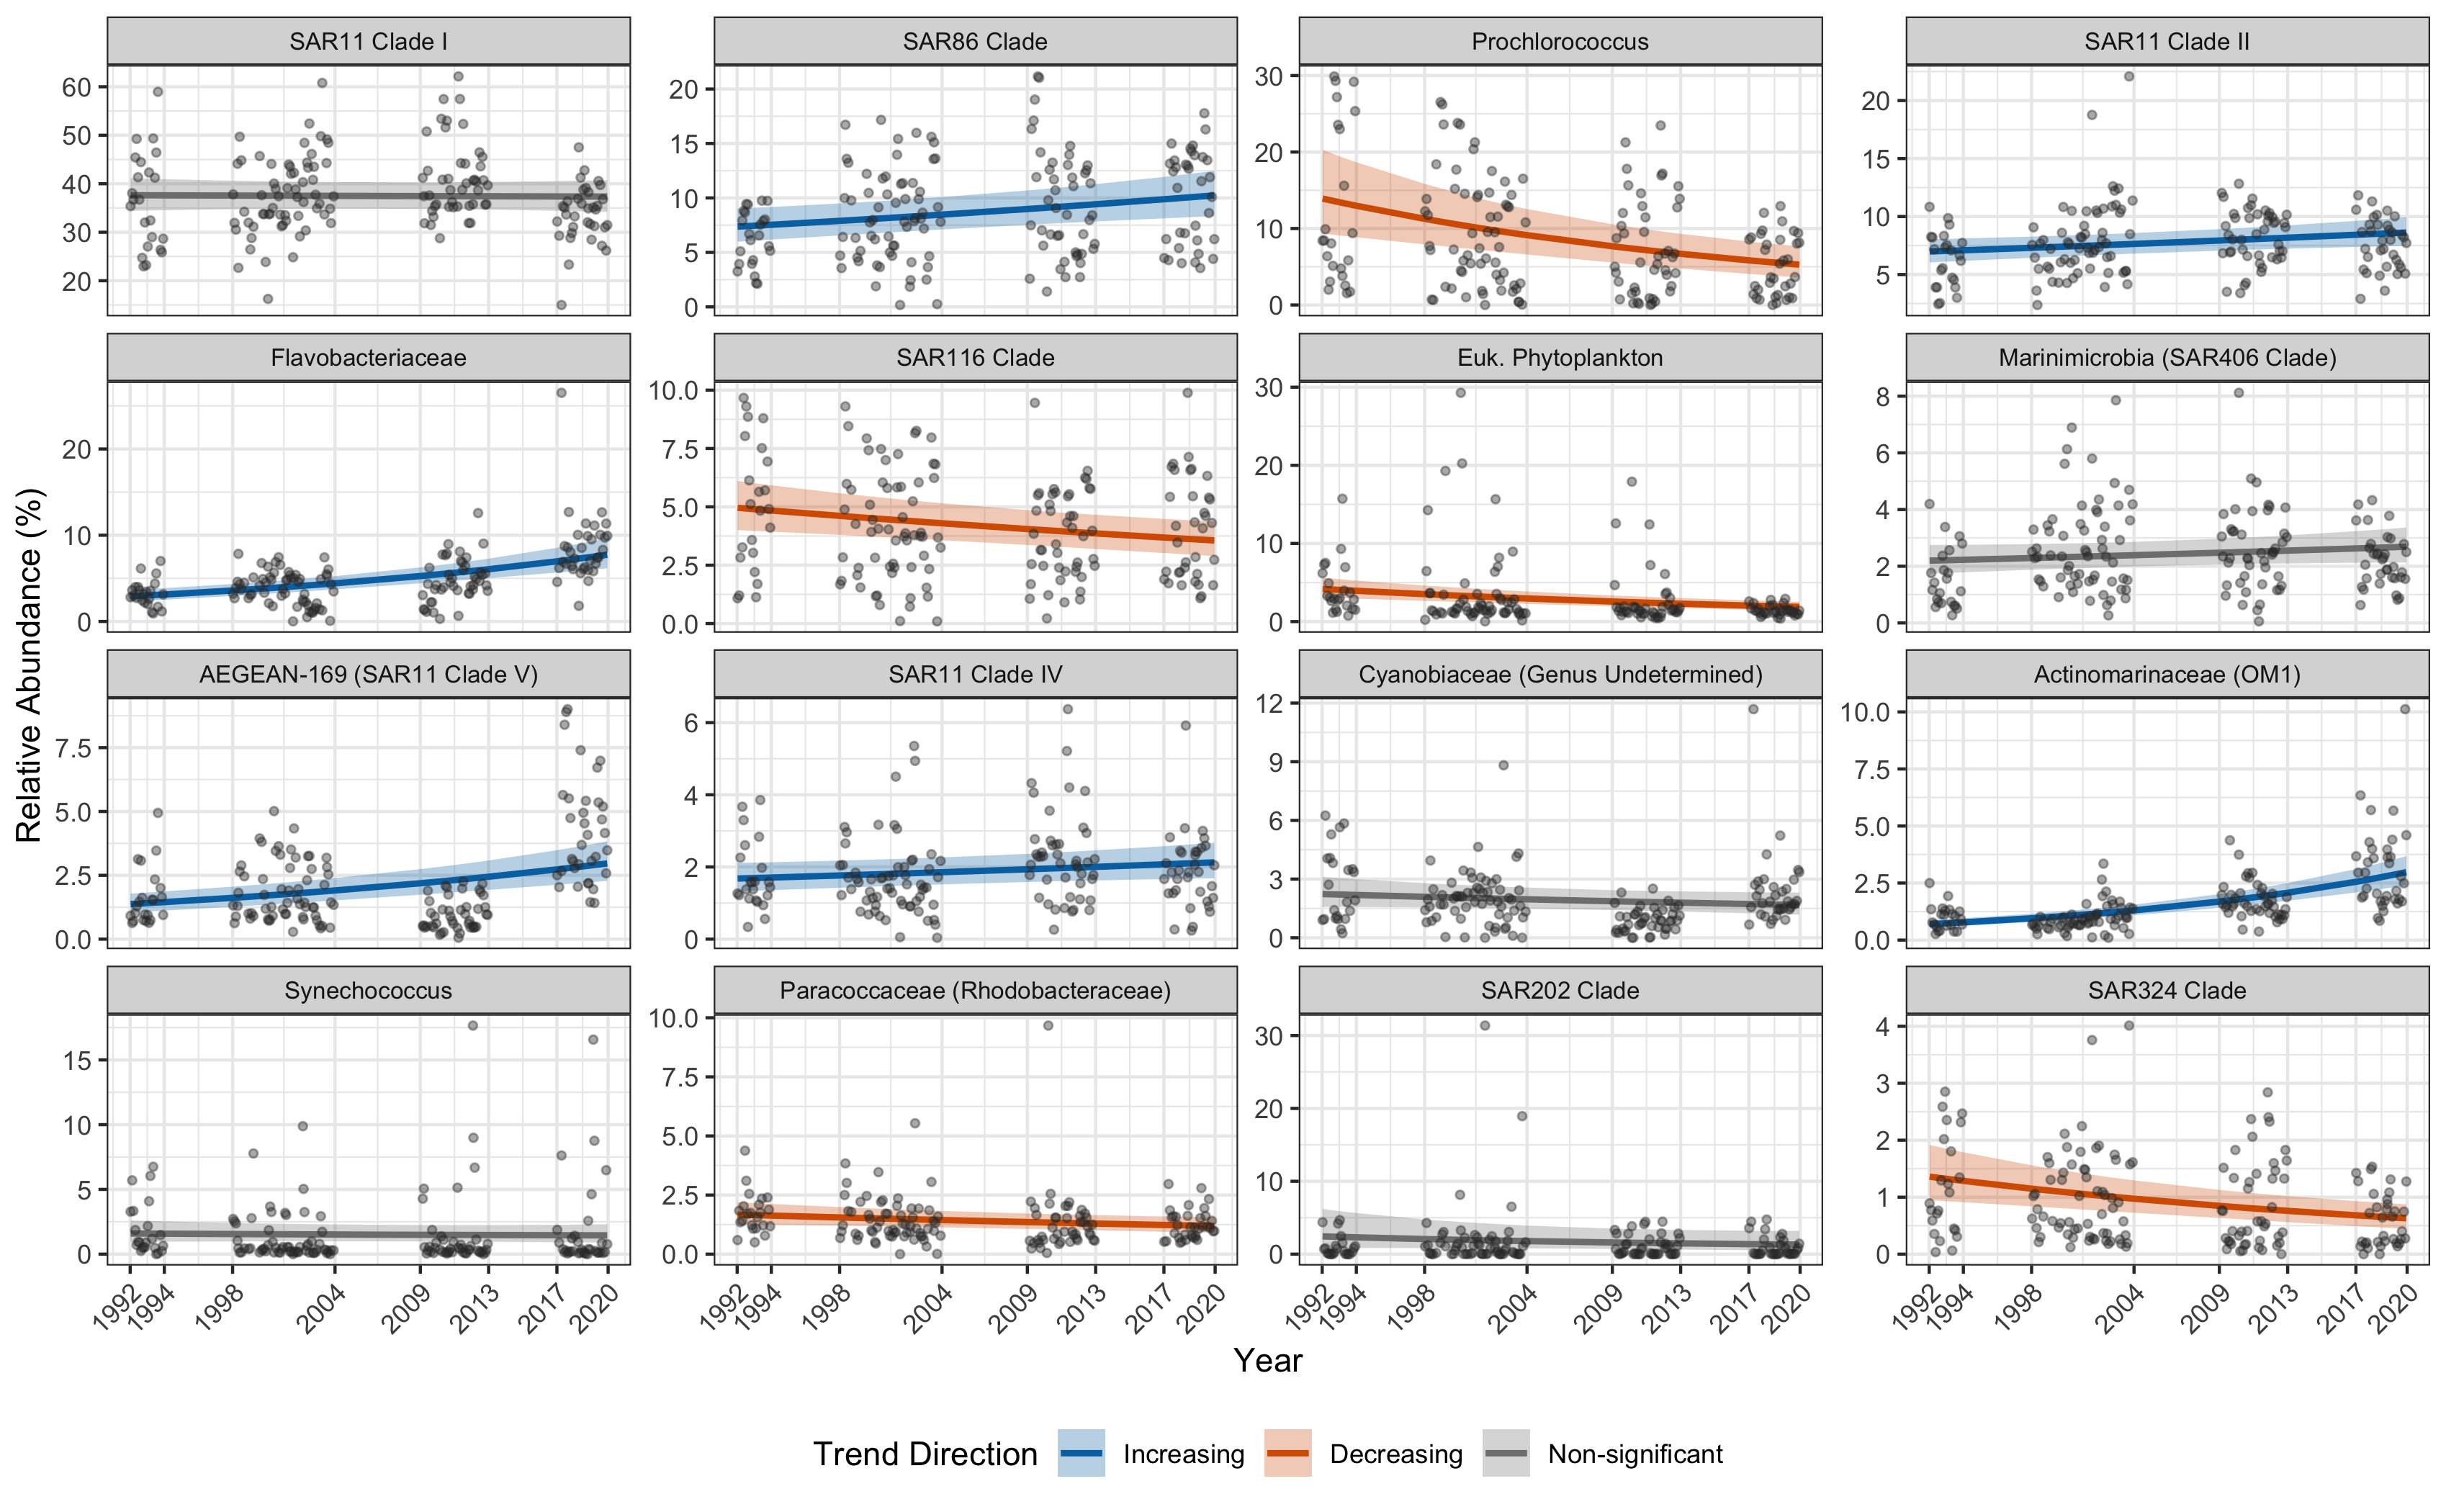
Example Workflow - Long Term Trends Study
We are analyzing 16S microbiome data from a 30 year time series
pixi init ltt
cd ltt
mkdir raw src rds fig # make directory strucure
➜ pixi add r-base r-ggplot2 r-dplyr r-forcats r-cowplot
✔ Added r-base >=4.5.2,<4.6
✔ Added r-ggplot2 >=4.0.0,<5
✔ Added r-dplyr >=1.1.4,<2
✔ Added r-forcats >=1.0.1,<2
✔ Added r-cowplot >=1.2.0,<2
➜ lsd --tree
.
├── fig # finished figures
├── pixi.lock # deterministic package definition
├── pixi.toml # pixi environment specifications
├── raw # symlinked raw data (do not edit)
├── rds # R data files (intermediate outputs)
└── src # R source code- Initialize git repo, add files as you generate them
Generating the Figures
- Add code to
srcdirectory
library(ggplot2)
library(dplyr)
library(forcats)

dat <- readRDS(file.path("rds", "dat.rds")) |>
  mutate(
    decimal_time_midpoint = decimal_time - median(decimal_time)
  )

mean_total <- dat |> pull(total) |> mean()

results <- readRDS(
  file.path(
    "rds",
    "posterior_summaries.rds"
  )
) |>
  mutate(relabd = mean_abundance / mean_total * 100)

all_predictions <- readRDS(
  file.path(
    "rds",
    "predictions_combined.rds"
  )
)

fig.labs <- tribble(
  ~taxon                                 ,
  ~label                                 ,
  "SAR11 Clade_I"                        ,
  "SAR11 Clade I"                        ,
  "SAR86_clade"                          ,
  "SAR86 Clade"                          ,
  "Prochlorococcus_MIT9313"              ,
  "Prochlorococcus"                      ,
  "SAR11 Clade_II"                       ,
  "SAR11 Clade II"                       ,
  "Flavobacteriaceae"                    ,
  "Flavobacteriaceae"                    ,
  "SAR116_clade"                         ,
  "SAR116 Clade"                         ,
  "Chloroplast Order"                    ,
  "Euk. Phytoplankton"                   ,
  "Marinimicrobia_(SAR406_clade) Phylum" ,
  "Marinimicrobia (SAR406 Clade)"        ,
  "AEGEAN-169_marine_group"              ,
  "AEGEAN-169 (SAR11 Clade V)"           ,
  "SAR11 Clade_IV"                       ,
  "SAR11 Clade IV"                       ,
  "SAR11 Clade_III"                      ,
  "SAR11 Clade III"                      ,
  "Cyanobiaceae Family"                  ,
  "Cyanobiaceae (Genus Undetermined)"    ,
  "Actinomarinaceae"                     ,
  "Actinomarinaceae (OM1)"               ,
  "Synechococcus_CC9902"                 ,
  "Synechococcus"                        ,
  "Paracoccaceae"                        ,
  "Paracoccaceae (Rhodobacteraceae)"     ,
  "SAR202_clade Order"                   ,
  "SAR202 Clade"                         ,
  "SAR324_clade(Marine_group_B) Phylum"  ,
  "SAR324 Clade"
) |>
  mutate(label = factor(label, levels = label))

results <- results |>
  left_join(fig.labs)

dat <- dat |>
  left_join(fig.labs, by = join_by(analysis_level == taxon))

all_predictions <- all_predictions |>
  left_join(fig.labs, by = join_by(analysis_level == taxon))

plot_temporal_percent_change <- function(
  results_df,
  n_top = 20,
  criterion = "mean_abundance"
) {
  top_results <- results_df |>
    filter(status == "success") |>
    arrange(desc(.data[[criterion]])) |>
    slice(1:n_top) |>
    mutate(
      percent_change = (exp(Median) - 1) * 100,
      percent_change_low = (exp(CI_low) - 1) * 100,
      percent_change_high = (exp(CI_high) - 1) * 100,
      percent_change_label = sprintf("%.2f%%", percent_change),
      label = fct_reorder(label, percent_change),
      trend_direction = case_when(
        CI_low > 0 & CI_high > 0 ~ "Increasing",
        CI_low < 0 & CI_high < 0 ~ "Decreasing",
        TRUE ~ "Non-significant"
      ),
      trend_direction = factor(
        trend_direction,
        levels = c("Increasing", "Decreasing", "Non-significant")
      )
    )

  ggplot(top_results, aes(x = percent_change, y = label)) +
    geom_vline(
      xintercept = 0,
      linetype = "dashed",
      color = "gray50",
      linewidth = 0.8
    ) +
    geom_errorbar(
      aes(
        xmin = percent_change_low,
        xmax = percent_change_high,
        color = trend_direction
      ),
      width = 0.3,
      linewidth = 0.8
    ) +
    geom_point(aes(color = trend_direction, size = relabd)) +
    geom_text(
      aes(label = percent_change_label, x = percent_change_high),
      hjust = -0.2,
      size = 3,
      color = "gray30"
    ) +
    scale_size_area(
      name = "Mean Rel. Abundance (%)",
      trans = "log10",
      breaks = c(1, 3, 10, 30),
      labels = c("1", "3", "10", "30")
    ) +
    scale_color_manual(
      name = "Trend Direction",
      values = c(
        "Increasing" = "#0072B2",
        "Decreasing" = "#D55E00",
        "Non-significant" = "gray50"
      )
    ) +
    scale_x_continuous(
      labels = function(x) paste0(x, "%"),
      expand = expansion(mult = c(0.075, 0.075))
    ) +
    labs(
      x = "Annual Change in Relative Abundance (%)",
      y = NULL
    ) +
    theme_bw() +
    theme(
      panel.grid.major.y = element_line(color = "gray90"),
      panel.grid.minor = element_blank(),
      axis.text.y = element_text(size = 10),
      legend.position = "bottom"
    ) +
    guides(color = guide_legend(override.aes = list(size = 3)))
}

p_percent_change <- plot_temporal_percent_change(results, n_top = 16)

message("Saving Figure_1.png to fig directory")
cowplot::save_plot(
  file.path(
    "fig",
    "Figure_1.png"
  ),
  plot = p_percent_change,
  base_height = 7,
  dpi = 300,
  bg = "white"
)

plot_top_taxa_faceted <- function(
  data,
  predictions,
  results_df,
  n_top = 20,
  criterion = "mean_abundance",
  log_scale = FALSE
) {
  time_offset <- median(data$decimal_time, na.rm = TRUE)

  top_taxa_info <- results_df |>
    filter(status == "success") |>
    arrange(desc(.data[[criterion]])) |>
    slice(1:n_top) |>
    mutate(
      trend_direction = case_when(
        CI_low > 0 & CI_high > 0 ~ "Increasing",
        CI_low < 0 & CI_high < 0 ~ "Decreasing",
        TRUE ~ "Non-significant"
      ),
      trend_direction = factor(
        trend_direction,
        levels = c("Increasing", "Decreasing", "Non-significant")
      )
    ) |>
    dplyr::select(taxon, trend_direction)

  top_taxa_names <- top_taxa_info |> pull(taxon)

  plot_data <- data |>
    filter(analysis_level %in% top_taxa_names) |>
    left_join(top_taxa_info, by = join_by(analysis_level == taxon)) |>
    mutate(
      relab_pct = Abundance / total * 100,
      year_original = decimal_time_midpoint + time_offset
    )

  plot_preds <- predictions |>
    filter(analysis_level %in% top_taxa_names) |>
    left_join(top_taxa_info, by = join_by(analysis_level == taxon)) |>
    mutate(
      pred_relab_pct = Estimate / total * 100,
      lower_pct = Q2.5 / total * 100,
      upper_pct = Q97.5 / total * 100,
      year_original = decimal_time_midpoint + time_offset
    )

  p <- ggplot(plot_preds, aes(x = year_original)) +
    geom_ribbon(
      aes(ymin = lower_pct, ymax = upper_pct, fill = trend_direction),
      alpha = 0.3
    ) +
    geom_line(
      aes(y = pred_relab_pct, color = trend_direction),
      linewidth = 1
    ) +
    geom_point(
      data = plot_data,
      aes(y = relab_pct),
      alpha = 0.4,
      size = 1,
      color = "gray20"
    ) +
    facet_wrap(~label, scales = "free_y", ncol = 4) +
    scale_color_manual(
      name = "Trend Direction",
      aesthetics = c("fill", "color"),
      values = c(
        "Increasing" = "#0072B2",
        "Decreasing" = "#D55E00",
        "Non-significant" = "gray50"
      )
    ) +
    labs(
      x = "Year",
      y = "Relative Abundance (%)"
    ) +
    theme_bw() +
    theme(
      strip.text = element_text(size = 8),
      legend.position = "bottom",
      axis.text.x = element_text(angle = 45, hjust = 1)
    )

  if (log_scale) {
    p <- p + scale_y_log10(labels = scales::label_number(accuracy = 0.01))
  }

  # Ensure the x-axis breaks are clean whole numbers for years
  p +
    scale_x_continuous(
      breaks = c(1992, 1994, 1998, 2004, 2009, 2013, 2017, 2020)
    )
}

# Example of how to use the updated function
p_faceted <- plot_top_taxa_faceted(dat, all_predictions, results, n_top = 16)
message("Saving Figure_2.png to fig directory")
ggsave(
  file.path(
    "fig",
    "Figure_2.png"
  ),
  plot = p_faceted,
  width = 16,
  height = 12,
  dpi = 300
)
You can use the pixi-managed R in your VS-Code or Positron editor to have a full IDE experience as well
Generating the Figures
- Run the Code
➜ Rscript src/figures.R
Error in library(ggplot2) : there is no package called ‘ggplot2’
Execution halted- Need to use
pixito run
➜ pixi run Rscript src/figures.R

Attaching package: ‘dplyr’

The following objects are masked from ‘package:stats’:

    filter, lag

The following objects are masked from ‘package:base’:

    intersect, setdiff, setequal, union

Joining with `by = join_by(taxon)`
Saving Figure_1.png to fig directory
Saving Figure_2.png to fig directory
Generating the Figures
Figure 1
Generating the Figures
Figure 2
Upload Your Repo
- You followed the steps, how can you share your data?
- Upload to Zenodo
- Upload: Upload the files you want to share.
- Describe: Describe the files with minimal metadata such as title and creators.
- Publish: When ready, hit the publish button to share your research.
- You’ll get a DOI number and link you can reference in your manuscript
Reproducible Figures: Key Takeaways
The Challenge: Manually tracking software for publications is tedious and error-prone, creating a barrier to truly reproducible science.
Pixi’s Solution: The
pixi.lockfile is committed to yourgitrepository alongside your analysis scripts, creating a single source of truth.Guaranteed Consistency: This lock file captures the exact versions of every package, ensuring that you, your collaborators, or reviewers can perfectly recreate the software environment with a simple
pixi install.Streamlined Publication: When you publish your work, the repository becomes a fully reproducible artifact. Others can run your analysis and generate the exact same figures, strengthening the impact of your research.
The Core Benefit
Pixi transforms reproducibility from a difficult, manual task into an integrated, automated part of the research workflow.
Real World Example #2 - HPC Disk Benchmark
The Challenge: Consistent Benchmarking at Scale
We needed to reliably benchmark disk performance across our HPC storage systems. This presented several challenges:
- Complex Build Process: The benchmark tool (
io500) must be compiled from source with specific compilers and libraries like OpenMPI. - Environment Consistency: The benchmark had to be run by multiple users on many different server nodes, requiring an identical software environment every time to ensure fair comparisons.
- Mixed Dependencies: The project required one set of tools for compiling the benchmark and a completely different set for analyzing the results (Python, Quarto, etc.).
Manually managing this process would be time-consuming and highly prone to error.
Pixi as a Portable Build & Execution System
Pixi provided a self-contained, reproducible recipe for the entire benchmark suite, solving all our key challenges.
Automated Build System:
pixi tasksautomated the entire workflow: downloading the source code, applying patches, and compiling the benchmark with the correct environment variables.Guaranteed Reproducibility: A team member could simply clone the repository and run
pixi install. Thepixi.lockfile ensured they got the exact same build environment and tools.Isolated Dependencies: Using
pixi environments(e.g.,benchandreport), we kept the complex C++/MPI build dependencies completely separate from the Python-based data analysis tools, preventing conflicts.
Directory Structure
This project includes compiled software and shell scripts to benchmark disk speed
➜ lsd --tree --depth 1
.
├── aggregate_results.py
├── aggregated_results.csv
├── config-nfs.ini
├── config-ssd.ini
├── config-test.ini
├── config.ini
├── gather_all_node_metadata.sh
├── gather_node_metadata.sh
├── io500
├── io500_analysis.qmd
├── io500_results
├── io500_wrapper.sh
├── opt
├── patch
├── pixi.lock
├── pixi.toml
├── README.md
└── reprocess_all_results.shAdvanced pixi.toml Setup
[project]
authors = ["Edward Davis <ed@cqls.oregonstate.edu>"]
channels = ["conda-forge", "bioconda"]
name = "hpc-disk-bench"
platforms = ["linux-64"]
version = "0.1.0"

[activation.env]
PATH = "${PIXI_PROJECT_ROOT}/opt/bin:${PATH}"
LD_LIBRARY_PATH = "${CONDA_PREFIX}/lib:${LD_LIBRARY_PATH}"
XDG_RUNTIME_DIR = "/${TMPDIR}/${USER}/run"
PREFIX = "${PIXI_PROJECT_ROOT}/opt"


[dependencies]
python = ">=3.14.0,<3.15"

[tasks]
aggregate = "aggregate_results.py io500_results"

[feature.bench.dependencies]
gnutls = ">=3.8.9,<4"
pkg-config = ">=0.29.2,<0.30"
openmpi = ">=5.0.8,<6"
compilers = ">=1.11.0,<2"
make = ">=4.4.1,<5"
autoconf = ">=2.72,<3"

[feature.report.dependencies]
pandas = ">=2.3.3,<3"
plotly = ">=6.3.1,<7"
quarto = ">=1.8.25,<2"
jupyterlab = ">=4.4.9,<5"
seaborn = ">=0.13.2,<0.14"
tabulate = ">=0.9.0,<0.10"

[feature.report.tasks]
render = "quarto render io500_analysis.qmd"

[feature.bench.tasks]
dl-io500 = "git clone https://github.com/IO500/io500.git && cd io500 && patch -p1 prepare.sh < ../patch/prepare.patch"
clean-io500 = "rm -rf io500"
test-io500 = "mpirun io500 config-test.ini"

[feature.bench.tasks.install-io500]
env = { CC = "mpicc" }
args = [{"arg" = "jobs", "default" = "1"}]
cmd = "mkdir -p opt && cd io500 && bash ./prepare.sh && make -j {{ jobs }} && install -m 755 io500 io500-verify $PREFIX/bin"

[environments]
report = ["report"]
bench = ["bench"]
pixi tasks
Tasks in pixi help facilitate running routine commands, e.g. dl for downloading, build for building software, etc. They are like shell scripts, but they can depend on other tasks so your install command can depend on the dl and build commands.
Find out more about pixi tasks here.
pixi Environments Help Isolate Dependencies
- We have dependencies for:
- base dependencies (python)
- benchmarking disks (io500)
- generating the report (quarto)
- Folks who need to benchmark the disks won’t necessarily need the report dependencies
- Allows separation of responsibility and reduces chances of conflict
pixi environments
Environments allow for different dependencies for each feature, which means if you need different versions of the same software for different parts of your workflow, you can do that! And if you set up the tasks per environment, you can just use pixi run to get the correct dependencies.
Find out more about pixi environments here.
Sharing pixi Environment Specifications
- The
hpc-disk-benchrepo is on our gitlab pixiis installed on each cluster- Each person clones the repo
- Run
pixi installto install the dependencies- The exact versions specified in the
pixi.lockfile will be installed
- The exact versions specified in the
- Use
pixi run io500to run theio500benchmark tool - Use
pixi run python aggregate_results.pyto aggregate the results - Use
pixi run renderto generate the report
Using pixi Reduces Labor Costs and Software Conflicts
- Each disk tester didn’t need to manually install the software, nor the dependencies, across disparate machines just to run the disk test
- The
pixi run ...syntax makes it easy to ensure the dependencies are correct - Routine commands can be aliased and made easier to remember with
pixi tasks, e.g.pixi renderinstead of having to remember thequartosyntax
Report
Check out the report here
HPC Benchmarking: Key Takeaways
The Challenge: Deploying and running compiled, multi-dependency software consistently across a shared HPC environment is a significant hurdle for reproducible research.
Pixi’s Solution: Pixi manages the entire software lifecycle from compilation to execution. It can act as a portable build system that codifies dependencies and automates complex build steps using tasks.
Separation of Concerns:
pixi environmentsallow you to isolate distinct project dependencies (e.g., building vs. analyzing), preventing conflicts and keeping the project clean.
The Real Impact
This transforms a complex, error-prone deployment task into a simple git clone and pixi install. It guarantees that every benchmark is identical, leading to reliable results while drastically reducing setup time and support load.
Real World Example #3 - Serving Models with vLLM
vLLM is a Production-Ready Inference and Serving Engine
The Challenge: Moving from Local AI to Production Serving
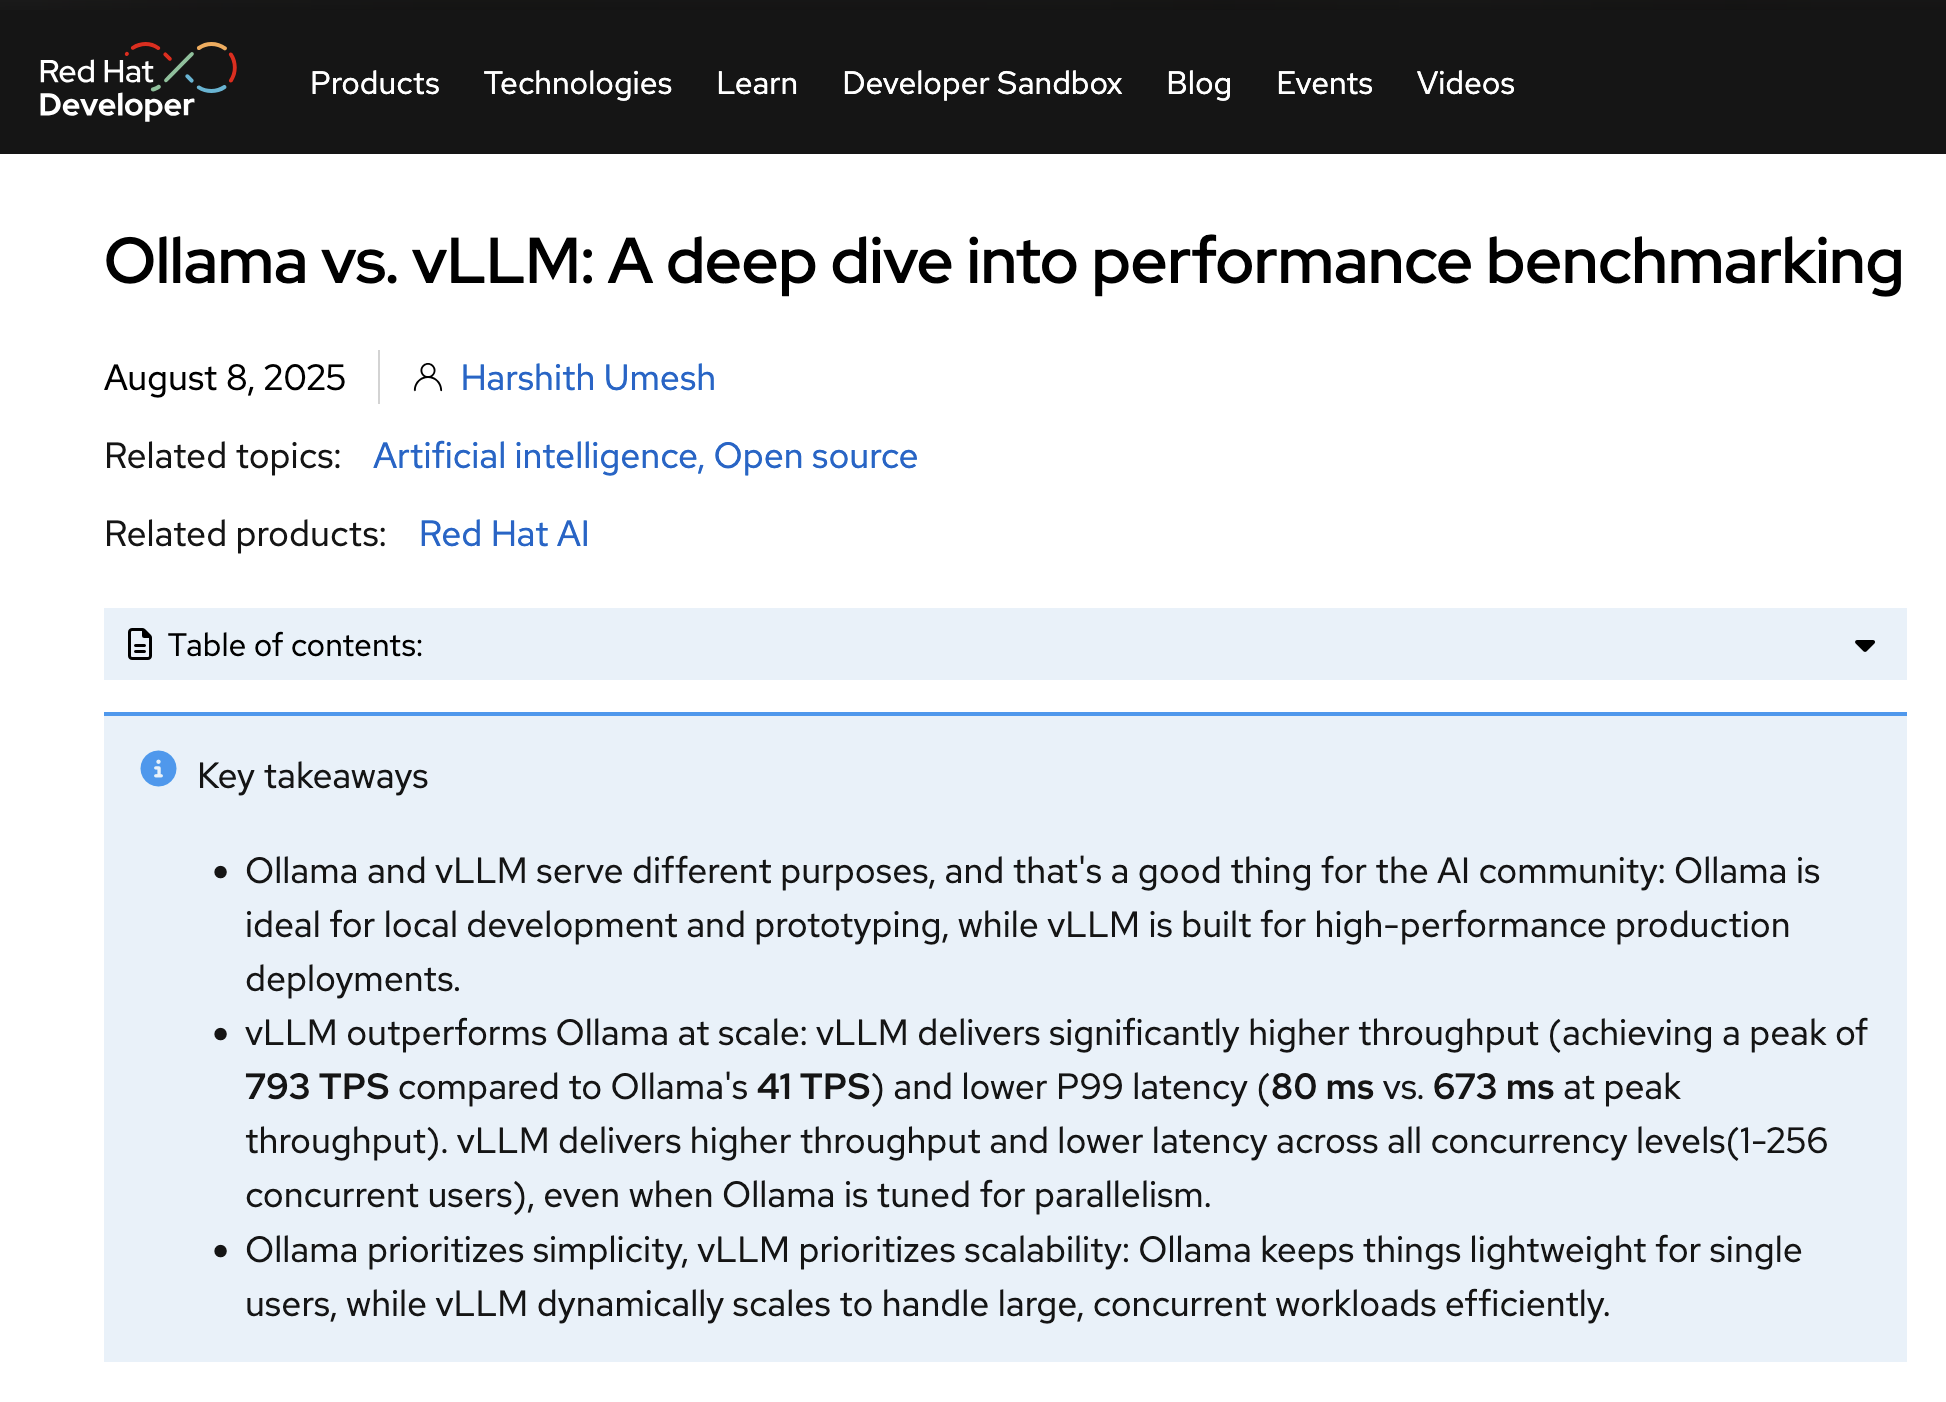
Tools like Ollama have made it incredibly easy to run large language models on personal machines. They are fantastic for local experimentation and getting started quickly.
However, for a shared, multi-user HPC environment, we need more:
- High Throughput: The ability to handle many requests simultaneously.
- Optimized Performance: Maximizing GPU utilization to reduce latency.
- Production-Ready Engine: A stable, reliable inference server.
This is where vLLM excels, offering a high-performance serving engine. The trade-off is a more complex installation process with specific GPU, CUDA, and PyPI dependencies.
Pixi for Robust AI Model Deployment
- Manages Complex GPU Dependencies: Pixi can pin specific CUDA versions and resolve mixed Conda and PyPI packages (like PyTorch and vLLM) into a single, stable lock file.
- Automates Serving with Tasks: Repetitive, long commands can be simplified. Pixi tasks act as executable shortcuts, which makes serving and updating settings easy.
- Manages Environment Configuration: Non-sensitive settings (like model paths or cache directories) can be defined as environment variables directly in
pixi.toml.
Managing Sensitive Information
While pixi.toml is great for public configuration, sensitive data like API keys should not be committed to git. Store these in a .env file and add that file to your .gitignore if the repo is going to be stored in an external repository.
Installing PyPI Packages using pixi
pixi supports both conda-style packages and those from PyPI
[workspace]
authors = ["Edward Davis <ed@cqls.oregonstate.edu>"]
channels = ["conda-forge", "bioconda"]
name = "vllm"
platforms = ["linux-64"]
version = "0.1.0"

[system-requirements]
cuda = "12.0"

[tasks]

[dependencies]
python = "3.12.*"

[pypi-dependencies]
torch = { version = "*", index = "https://download.pytorch.org/whl/cu128" }
torchvision = { version = "*", index = "https://download.pytorch.org/whl/cu128" }
Note
Make sure to add a python version, e.g. pixi add python=3.12 as above before trying to install PyPI dependencies or you will get an error message.
Why install from PyPI instead of conda?
- Some packages have rapid development cycles and don’t get as fast updates on conda
- Specific conda packages might be tied to other package versions, especially when gpus are involved
- If your package is available in conda, prefer that version, but you can fall back to installing from PyPI if necessary
Tip
Since v0.10.2, vllm supports python wheels for aarch64 cpu arch, including Grace Hopper machines, making LLM serving from those machines even easier.
Getting ready to serve
[workspace]
authors = ["Edward Davis <ed@cqls.oregonstate.edu>"]
channels = ["conda-forge", "bioconda"]
name = "vllm"
platforms = ["linux-64"]
version = "0.1.0"

[system-requirements]
cuda = "12.0"

[activation.env]
XDG_DATA_HOME = "/scratch/davised/storage"
XDG_CONFIG_HOME = "/scratch/davised/config"
XDG_CACHE_HOME = "/scratch/davised/cache"

[tasks]
[tasks.serve]
args = [
  { arg = "model", default = "ibm-granite/granite-4.0-micro" },
  { arg = "maxlen", default = "64K" },
  { arg = "memory", default = "0.95" },
  { arg = "offload", default = "0" },
  { arg = "api_key", default = "cqls-test-api" },
  { arg = "host", default = "0.0.0.0" },
  { arg = "port", default = "9000" },
]
cmd = "vllm serve --host {{host}} --port {{port}} {{model}} --max_model_len {{maxlen}} --api-key {{api_key}} --gpu-memory-utilization {{memory}} --cpu-offload-gb {{offload}}"

[dependencies]
python = "3.12.*"

[pypi-dependencies]
torch = { version = "*", index = "https://download.pytorch.org/whl/cu128" }
torchvision = { version = "*", index = "https://download.pytorch.org/whl/cu128" }
vllm = ">=0.10"
Let’s test it out:
➜ pixi run serve
✨ Pixi task (serve): vllm serve --host 0.0.0.0 --port 9000 ibm-granite/granite-4.0-micro --max_model_len 64K --api-key cqls-test-api --gpu-memory-utilization 0.95 --cpu-offload-gb 0                                                                                                                                      INFO 11-12 00:09:07 [__init__.py:216] Automatically detected platform cuda.
(APIServer pid=706212) INFO 11-12 00:09:10 [api_server.py:1839] vLLM API server version 0.11.0
(APIServer pid=706212) INFO 11-12 00:09:10 [utils.py:233] non-default args: {'model_tag': 'ibm-granite/granite-4.0-micro', 'host': '0.0.0.0', 'port': 9000, 'api_key': ['cqls-test-api'], 'model': 'ibm-granite/granite-4.0-micro', 'max_model_len': 65536, 'gpu_memory_utilization': 0.95}
(APIServer pid=706212) INFO 11-12 00:09:11 [model.py:547] Resolved architecture: GraniteMoeHybridForCausalLM
(APIServer pid=706212) `torch_dtype` is deprecated! Use `dtype` instead!
(APIServer pid=706212) WARNING 11-12 00:09:11 [model.py:1682] Your device 'Tesla T4' (with compute capability 7.5) doesn't support torch.bfloat16. Falling back to torch.float16 for compatibility.
A Quick Query
➜ xh cqls-gpu4.hpc.oregonstate.edu:9000/v1/responses -A bearer -a cqls-test-api model=ibm-granite/granite-4.0-micro 'input=Define "mitochondria"' | jq -r '.output[0].content[0].text'

Mitochondria are organelles found in eukaryotic cells. They are often referred to as the "powerhouse" of the cell
because they play a crucial role in energy production. The primary function of mitochondria is to generate adenosine
triphosphate (ATP), the energy currency of the cell, through a process known as oxidative phosphorylation.

Besides their role in energy production, mitochondria are also involved in other cellular processes such as regulation
of the cell cycle, cell signaling, and cellular respiration. They contain their own DNA, which is distinct from the DNA
found in the nucleus of the cell, and can replicate independently.

Furthermore, mitochondria play a key role in programmed cell death (apoptosis) and are involved in the control of the
cell's lifespan. Any dysfunction or damage to the mitochondria can lead to various health issues, including
neurodegenerative diseases, muscular dystrophy, and metabolic disorders.- It works!
- Can adapt the serve call with different parameters depending on model being served
AI Model Serving: Key Takeaways
The Challenge: Deploying high-performance inference engines like vLLM involves managing a fragile ecosystem of GPU drivers, CUDA versions, and specific PyPI packages, which is a major barrier to production use.
Pixi’s Solution: Pixi creates a reproducible “recipe” for the entire serving environment. It precisely manages the CUDA system requirements, resolves the Conda/PyPI dependency tree, and provides a simple, unified interface for execution.
Simplified Operations:
pixi tasksabstract away complexvllm servecommands, turning a long, error-prone command into a simplepixi run serve. This makes the model server easy to launch for any user.
The Real Impact
Pixi bridges the gap between local AI experimentation and production-grade deployment. It empowers researchers to stand up and manage powerful AI inference servers without needing to be expert system administrators.
Real World Example #4 - Developing RAG Pipeline
The Goal: An AI-Powered Assistant for HPC Documentation
Our HPC documentation is extensive, but users often struggle to find the exact information they need. We wanted to build a custom AI assistant to answer questions using our own knowledge base.
This required a Retrieval-Augmented Generation (RAG) pipeline, which involves several complex components:
- A Knowledge Base: A vector database (
LanceDB) to store our embeddings for documentation and SQL (sqlite) to store the contents. - An Embedder: A model to convert text into numerical representations.
- An LLM: A large language model (
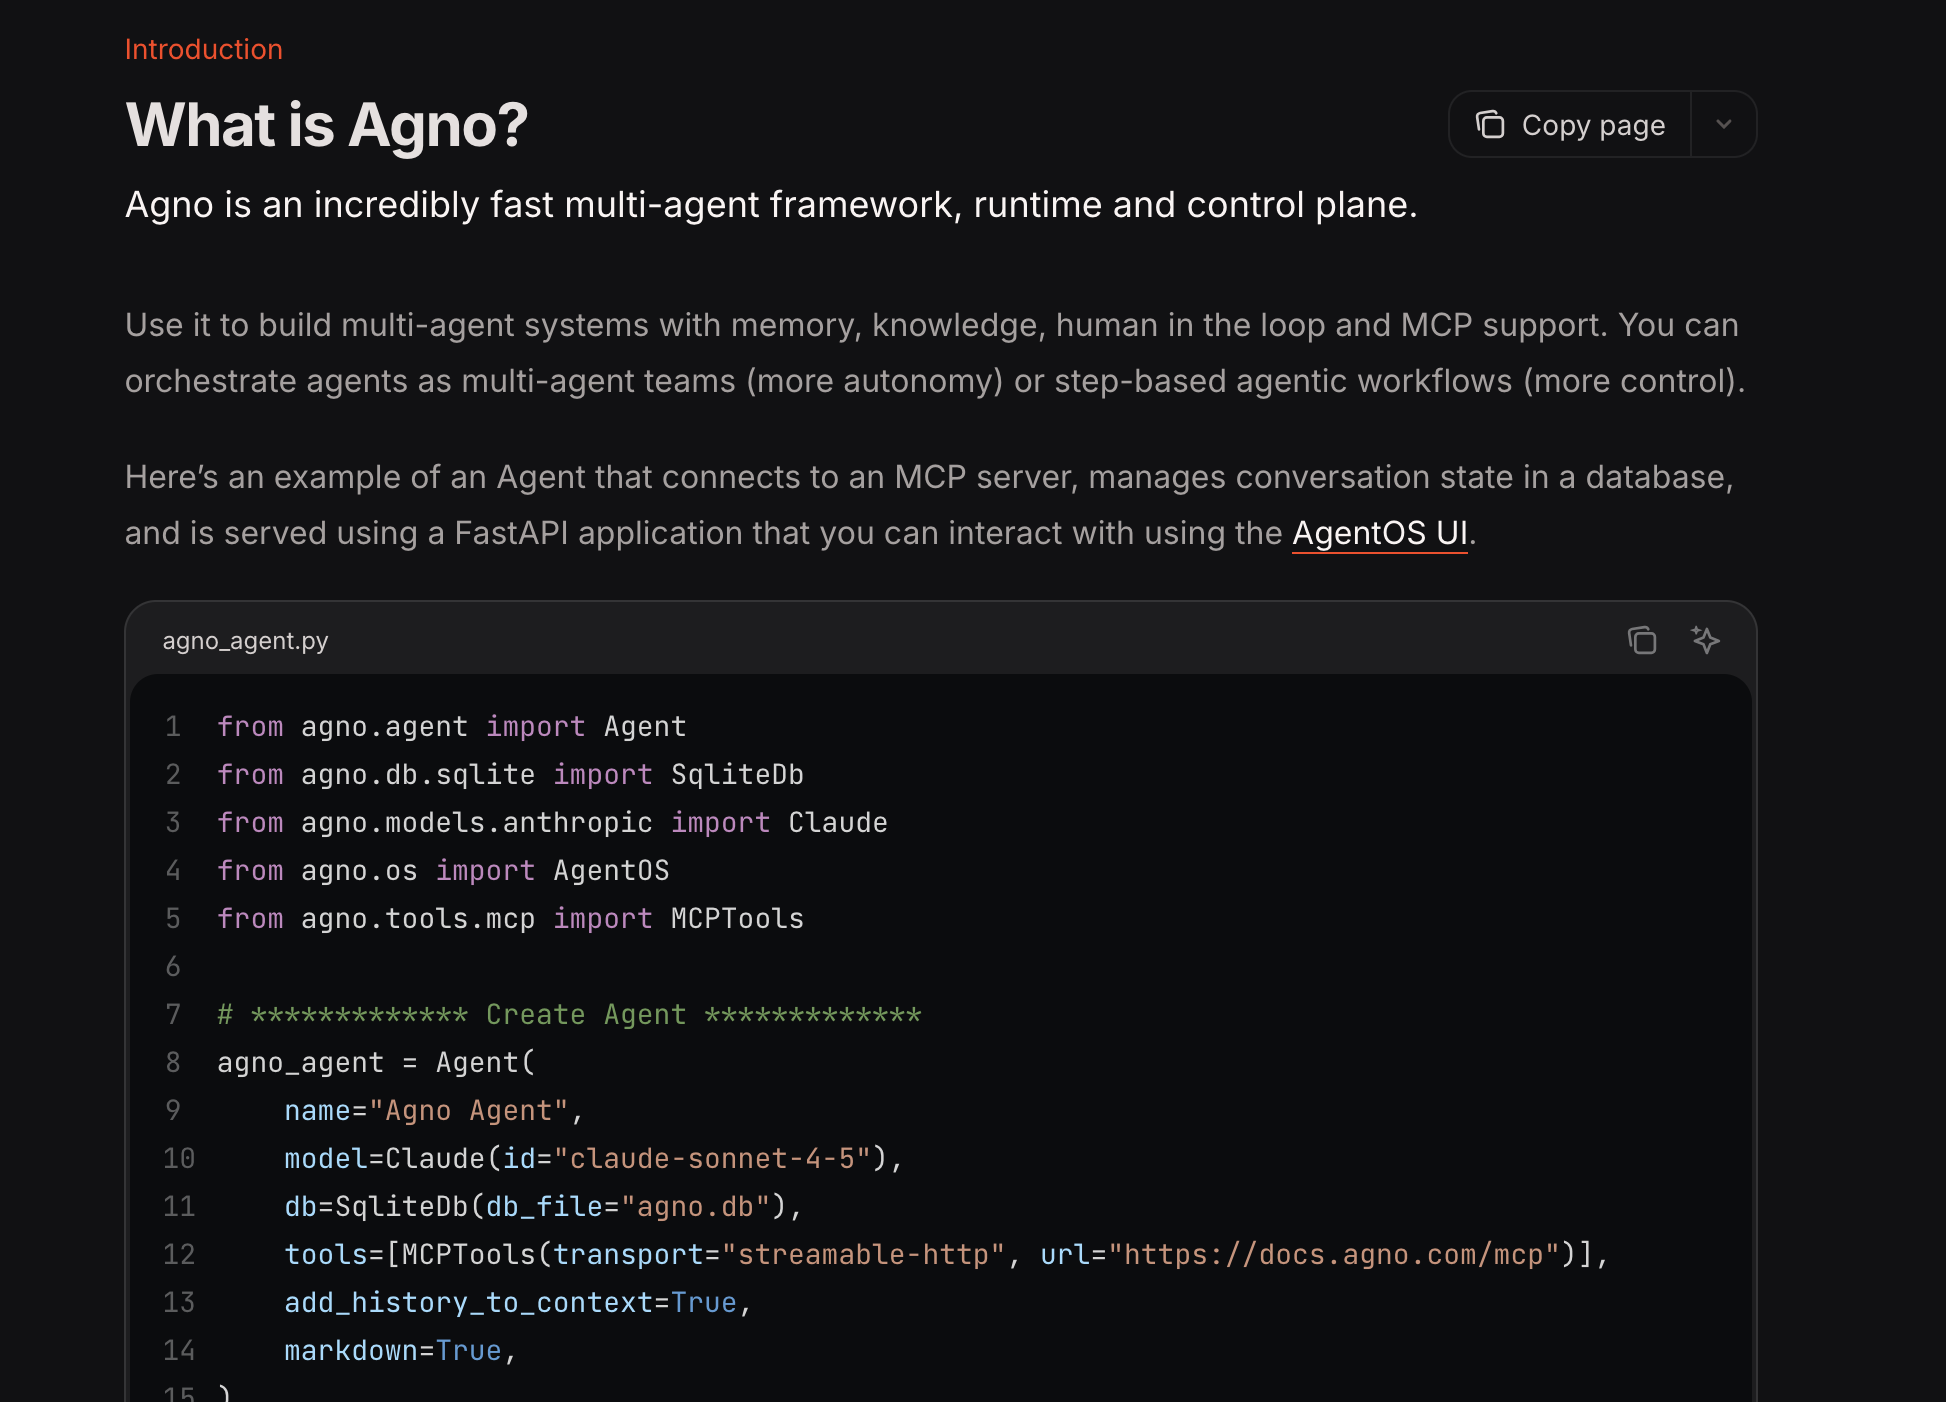
vLLM-served) to generate answers. - An Application Framework: An agent framework (
Agno) to tie everything together and serve it via an API.
Managing this stack of modern Python libraries creates a significant development challenge.
Pixi for Modern Python Application Development
Pixi provides a robust foundation for building and managing a full-fledged Python application like this RAG pipeline.
- Standardized Project Structure: By using a
pyproject.tomlfile, Pixi integrates directly into the standard Python ecosystem, making the project familiar to any Python developer. - Unified Dependency Management: It seamlessly manages a complex mix of dependencies from different sources: Conda (
python), PyPI (lancedb,vllm), and even local, editable installs of our own code. - Streamlined Developer Workflow: Pixi tasks automate common development actions. A developer can run
pixi run ingest-docsto update the knowledge base orpixi run serveto launch the application, without needing to remember the underlying commands.
Setting up a Python Project in pixi
pixi init --format pyproject cqls-hpc-website-kb
cd cqls-hpc-website-kb
... Develop your code and add dependencies, resulting in:
➜ lsd --tree
.
├── kb ⇒ ../cqls-hpc-website/knowledge_base
├── pixi.lock
├── pyproject.toml
├── src
│ └── cqls_hpc_website_kb
│ ├── __init__.py
│ ├── agent.py
│ ├── app.py
│ ├── db.py
│ ├── embedder.py
│ ├── ingest.py
│ └── reader
│ ├── __init__.py
│ └── mkdocs.py
├── test_agent.py
├── test_knowledge.py
└── tunnel- Instead of using a
pixi.toml, you can use apyproject.tomlwhich allows development of python code - You can run e.g.
pixi run python -m cqls_hpc_website_kb ...for testing the project during development
Dependencies
[project]
authors = [{name = "Edward Davis", email = "ed@cqls.oregonstate.edu"}]
dependencies = ["lancedb>=0.25.2,<0.26", "openai>=2.7.1,<3", "agno[sql]>=2.2.10,<3", "python-dotenv>=1.2.1,<2", "vllm>=0.10.0,<0.12", "pandas>=2.3.3,<3", "tantivy>=0.25.0,<0.26", "beautifulsoup4>=4.14.2,<5", "chonkie[st]>=1.4.1,<2", "ag-ui-protocol>=0.1.10,<0.2"]
name = "cqls-hpc-website-kb"
requires-python = ">= 3.12"
version = "0.1.0"

[tool.pixi.system-requirements]
cuda = "12.0"

[build-system]
build-backend = "hatchling.build"
requires = ["hatchling"]

[tool.pixi.workspace]
channels = ["conda-forge", "bioconda"]
platforms = ["linux-64"]

[tool.pixi.pypi-dependencies]
cqls_hpc_website_kb = { path = ".", editable = true }
torch = { version = "*", index = "https://download.pytorch.org/whl/cu128" }
torchvision = { version = "*", index = "https://download.pytorch.org/whl/cu128" }

[tool.pixi.tasks]
ingest-docs = "python -m cqls_hpc_website_kb.ingest"
serve = "python -m cqls_hpc_website_kb.app"- Syntax is slightly different, but still recognizable
Tip
Check out this page to find out more about using pixi and Python together.
Agno Makes Building AI-driven Agents Easy
Checking Out the Code
Extracting Info from mkdocs
- Using a custom hook
"""
MkDocs hook for building agno knowledge base with change detection.

Add this to your mkdocs.yml:
hooks:
  - hooks/build_knowledge_base.py

Configuration in mkdocs.yml:
extra:
  agno_knowledge:
    enabled: true
    output_dir: knowledge_base
"""

import hashlib
import json
import logging
from pathlib import Path
from typing import Dict, Optional, Set

from mkdocs.config.defaults import MkDocsConfig
from mkdocs.structure.files import Files
from mkdocs.structure.pages import Page

log = logging.getLogger("mkdocs")


def compute_content_hash(content: str) -> str:
    """Compute SHA256 hash of content for change detection."""
    return hashlib.sha256(content.encode('utf-8')).hexdigest()


class KnowledgeBaseBuilder:
    """
    Builds a knowledge base from MkDocs pages with change tracking.

    Uses content hashing to detect changes and only updates modified pages.
    This eliminates the need for expensive re-embedding of unchanged content.
    """

    def __init__(self):
        self.pages_data: Dict[str, Dict] = {}  # URL -> page data
        self.config: Optional[MkDocsConfig] = None
        self.site_url: str = ""
        self.output_dir: Path = Path("knowledge_base")
        self.cache_file: Path = Path(".mkdocs_kb_cache.json")
        self.cached_hashes: Dict[str, str] = {}  # URL -> content hash
        self.changed_pages: Set[str] = set()
        self.deleted_pages: Set[str] = set()

    def on_config(self, config: MkDocsConfig) -> MkDocsConfig:
        """Initialize configuration and load cache."""
        self.config = config
        self.site_url = config.get("site_url", "").rstrip("/")

        extra = config.get("extra", {})
        self.kb_config = extra.get("agno_knowledge", {})
        self.enabled = self.kb_config.get("enabled", True)
        if output_dir := extra.get("output_dir", ""):
            self.output_dir = Path(output_dir)

        if not self.enabled:
            return config

        # Load existing cache
        if self.cache_file.exists():
            try:
                with open(self.cache_file, "r") as f:
                    cache_data = json.load(f)
                    self.cached_hashes = cache_data.get("hashes", {})
                log.info(f"Loaded cache with {len(self.cached_hashes)} entries")
            except Exception as e:
                log.warning(f"Failed to load cache: {e}")
                self.cached_hashes = {}

        log.info("Agno Knowledge Base builder enabled with change detection")
        return config

    def on_page_content(
        self, html: str, page: Page, config: MkDocsConfig, files: Files
    ) -> str:
        """Process page and detect changes using content hashing."""
        if not self.enabled:
            return html

        page_url = page.url
        if self.site_url:
            full_url = f"{self.site_url}/{page_url}"
        else:
            full_url = page_url

        if "cqls/presentations/" in full_url:
            log.debug(f"Skipping presentations page: {full_url}")
            return html

        # Compute hash of markdown content
        if page.markdown is not None:
          content_hash = compute_content_hash(page.markdown)
        else:
          content_hash = None

        # Check if content changed
        cached_hash = self.cached_hashes.get(full_url)

        if cached_hash is None:
            log.info(f"New page: {page.title} {full_url}")
        elif cached_hash != content_hash:
            log.info(f"Modified page: {page.title} {full_url}")
            self.changed_pages.add(full_url)
        else:
            log.debug(f"Unchanged page: {page.title} {full_url}")

        # Store page data
        page_data = {
            "id": full_url,
            "url": full_url,
            "title": page.title or "",
            "content": page.markdown,
            "html": html,
            "content_hash": content_hash,
            "meta": {
                "url": full_url,
                "title": page.title or "",
                "file_path": str(page.file.src_path),
                "is_homepage": page.is_homepage,
                "is_section": page.is_section,
                "is_page": page.is_page,
                "is_top_level": page.is_top_level,
                "is_api": "hpcman/api" in full_url
            },
        }

        # if hasattr(page, "meta") and page.meta:
        #     page_data["meta"]["frontmatter"] = page.meta

        self.pages_data[full_url] = page_data
        return html

    def on_post_build(self, config: MkDocsConfig) -> None:
        """Save data and update cache after build."""
        if not self.enabled or not self.pages_data:
            return

        # Detect deleted pages
        current_urls = set(self.pages_data.keys())
        cached_urls = set(self.cached_hashes.keys())
        self.deleted_pages = cached_urls - current_urls

        if self.deleted_pages:
            log.info(f"Deleted pages: {len(self.deleted_pages)}")

        # Create output directory
        self.output_dir.mkdir(parents=True, exist_ok=True)

        # Save full content (for initial load or reference)
        full_output = self.output_dir / "mkdocs_content.json"
        with open(full_output, "w", encoding="utf-8") as f:
            json.dump(
                {
                    "site_name": config.get("site_name", ""),
                    "site_url": self.site_url,
                    "pages": list(self.pages_data.values()),
                },
                f,
                indent=2,
                ensure_ascii=False,
                default=str,
            )

        # Save incremental changes (only changed/new pages)
        if self.changed_pages:
            changes_output = self.output_dir / "mkdocs_changes.json"
            changed_pages_data = [
                self.pages_data[url] for url in self.changed_pages
            ]
            with open(changes_output, "w", encoding="utf-8") as f:
                json.dump(
                    {
                        "changed_pages": changed_pages_data,
                        "deleted_pages": list(self.deleted_pages),
                    },
                    f,
                    indent=2,
                    ensure_ascii=False,
                    default=str,
                )
            log.info(f"Saved {len(self.changed_pages)} changed pages")

        # Update cache
        new_cache = {
            "hashes": {
                url: data["content_hash"]
                for url, data in self.pages_data.items()
            }
        }
        with open(self.cache_file, "w") as f:
            json.dump(new_cache, f, indent=2)

        # Summary
        log.info(
            f"Knowledge base updated: "
            f"{len(self.pages_data)} total, "
            f"{len(self.changed_pages)} changed, "
            f"{len(self.deleted_pages)} deleted"
        )


# Singleton instance
_kb_builder = KnowledgeBaseBuilder()


# Hook functions
def on_config(config: MkDocsConfig, **kwargs) -> MkDocsConfig:
    return _kb_builder.on_config(config)


def on_page_content(html: str, page: Page, config: MkDocsConfig, files: Files, **kwargs) -> str:
    return _kb_builder.on_page_content(html, page, config, files)


def on_post_build(config: MkDocsConfig, **kwargs) -> None:
    _kb_builder.on_post_build(config)
Checking Out the Code
Chunking Data
"""
Custom reader for loading MkDocs content into Agno with incremental updates.

This reader supports both full loads and incremental updates based on
change detection from the MkDocs hook.
"""

import json
from dataclasses import dataclass
from pathlib import Path

# from agno.knowledge.chunking.semantic import SemanticChunking
# from cqls_hpc_website_kb.embedder import get_embedder
# from agno.knowledge.chunking.agentic import AgenticChunking
# from cqls_hpc_website_kb.agent import get_model
from agno.knowledge.chunking.strategy import ChunkingStrategy, ChunkingStrategyType
from agno.knowledge.document.base import Document
from agno.knowledge.reader.base import Reader
from agno.knowledge.types import ContentType
from agno.utils.log import log_debug, logger
from bs4 import BeautifulSoup as html_parser
from agno.knowledge.chunking.recursive import RecursiveChunking


@dataclass
class MkDocsReader(Reader):
    """
    Reader for MkDocs documentation with incremental update support.

    This reader loads content from the MkDocs hook output and supports
    incremental updates to avoid re-processing unchanged pages.

    Args:
        chunking_strategy: Optional chunking strategy (None recommended for docs)
        use_html: If True, use HTML. If False, use markdown (default)
        incremental: If True, only process changed pages (default True)
    """

    use_html: bool = False
    incremental: bool = True
    # semantic_chunker = SemanticChunking(embedder = get_embedder())
    # agentic_chunker = AgenticChunking(model=get_model())
    skip_api_docs: bool = True

    def __init__(
        self,
        chunking_strategy: ChunkingStrategy = RecursiveChunking(chunk_size=5000, overlap=500),
        use_html: bool = True,
        incremental: bool = True,
        skip_api_docs: bool = True,
        **kwargs,
    ):
        super().__init__(chunking_strategy=chunking_strategy, **kwargs)
        self.use_html = use_html
        self.incremental = incremental
        self.skip_api_docs = skip_api_docs

    @classmethod
    def get_supported_chunking_strategies(cls) -> list[ChunkingStrategyType]:
        """Supported chunking strategies (though not recommended for docs)."""
        return [
            ChunkingStrategyType.AGENTIC_CHUNKER,
            ChunkingStrategyType.DOCUMENT_CHUNKER,
            ChunkingStrategyType.RECURSIVE_CHUNKER,
            ChunkingStrategyType.SEMANTIC_CHUNKER,
            ChunkingStrategyType.FIXED_SIZE_CHUNKER,
            ChunkingStrategyType.MARKDOWN_CHUNKER,
        ]

    @classmethod
    def get_supported_content_types(cls) -> list[ContentType]:
        return [ContentType.JSON]

    def _process_page(self, page: dict, site_name: str) -> list[Document]:
        """Process a single page into documents."""
        if self.use_html:
            html = html_parser(page.get("html"), "html.parser")
            content = html.get_text(strip=True, separator=" ").replace("\n", " ")
        else:
            content = page.get("content")

        if not content:
            logger.warning(f"No content for page: {page.get('title')}")
            return []

        if self.skip_api_docs and page.get("meta", {}).get("is_api", False) or page.get("meta", {}).get("skip", False):
            logger.info(f"Skipping page: {page.get('title')}")
            return []


        doc = Document(
            name=page.get("title", site_name),
            id=page["id"],
            meta_data=page["meta"],
            content=content,
        )

        if self.chunk:
            logger.info(f"Chunking: {doc.name} (ID: {doc.id})")
            return self.chunk_document(doc)
        return [doc]


    def read(self, obj: str, name: str | None = None, password: str | None = None) -> list[Document]:
        """
        Read MkDocs content with support for incremental updates.

        Args:
            path: Path to knowledge_base directory (not the JSON file)
            name: Optional name override

        Returns:
            List of documents (full or incremental based on incremental flag)
        """
        path_obj = Path(obj)

        # Handle both directory and file paths
        if path_obj.is_file():
            content_dir = path_obj.parent
            content_file = path_obj
        else:
            content_dir = path_obj
            content_file = content_dir / "mkdocs_content.json"

        if not content_file.exists():
            raise FileNotFoundError(
                f"MkDocs content not found: {content_file}\n"
                "Run 'mkdocs build' first."
            )

        # Load full content
        with open(content_file, "r", encoding="utf-8") as f:
            data = json.load(f)

        site_name = name or data.get("site_name", "MkDocs Site")

        # Check for incremental updates
        changes_file = content_dir / "mkdocs_changes.json"

        if self.incremental and changes_file.exists():
            log_debug("Using incremental update mode")
            with open(changes_file, "r", encoding="utf-8") as f:
                changes = json.load(f)

            changed_pages = changes.get("changed_pages", [])
            deleted_ids = set(changes.get("deleted_pages", []))

            if not changed_pages and not deleted_ids:
                log_debug("No changes detected")
                return []

            log_debug(
                f"Processing {len(changed_pages)} changed pages, "
                f"{len(deleted_ids)} deletions"
            )

            documents = []
            for page in changed_pages:
                documents.extend(self._process_page(page, site_name))

            # Store deletion info for downstream processing
            if deleted_ids and documents:
                # Add deletion metadata to first document
                documents[0].meta_data["_deleted_ids"] = list(deleted_ids)

            return documents
        else:
            # Full load
            log_debug(f"Loading full knowledge base: {len(data.get('pages', []))} pages")
            pages = data.get("pages", [])

            documents = []
            for page in pages:
                documents.extend(self._process_page(page, site_name))

            logger.info(f"Loaded {len(documents)} documents")
            return documents

    def get_deleted_ids(self, path: str) -> set[str]:
        """
        Get list of deleted page IDs.

        This is useful for removing documents from the vector DB.
        """
        path_obj = Path(path)
        if path_obj.is_file():
            changes_file = path_obj.parent / "mkdocs_changes.json"
        else:
            changes_file = path_obj / "mkdocs_changes.json"

        if not changes_file.exists():
            return set()

        with open(changes_file, "r", encoding="utf-8") as f:
            changes = json.load(f)

        return set(changes.get("deleted_pages", []))
Checking Out the Code
Embedder
from agno.knowledge.embedder.vllm import VLLMEmbedder
from dotenv import load_dotenv
import os
import logging
logging.basicConfig(level=logging.INFO, format='%(asctime)s - %(name)s - %(levelname)s - %(message)s')
logger = logging.getLogger(__name__)
# Load environment variables from .env file
load_dotenv()

# Access the environment variables
# Retrieve environment variables with safe defaults
embedding_model = os.getenv("EMBEDDING_MODEL", "")
# Convert dimension to int safely; fallback to 0 on error
_dim_str = os.getenv("EMBEDDING_DIM")
try:
    embedding_dim = int(_dim_str) if _dim_str is not None else 0
except (ValueError, TypeError):
    embedding_dim = 0
embedding_api_key = os.getenv("EMBEDDING_BINDING_API_KEY", "")
embedding_host = os.getenv("EMBEDDING_BINDING_HOST", "")


def get_embedder() -> VLLMEmbedder:
  logger.info("Embedding model: %s", embedding_model)
  logger.info("Embedding dimension: %s", embedding_dim)
  logger.info("Embedding host: %s", embedding_host)
  return VLLMEmbedder(
    id=embedding_model,
    dimensions=embedding_dim,
    base_url=embedding_host,
    api_key=embedding_api_key,
  )
Checking Out the Code
Vector Embedding Storage
#!/usr/bin/env python3
from pathlib import Path
from agno.knowledge.knowledge import Knowledge
from agno.vectordb.search import SearchType
from agno.vectordb.lancedb import LanceDb
from agno.vectordb.base import VectorDb
from agno.db.sqlite import SqliteDb
from agno.db import BaseDb
from .embedder import get_embedder

VECTOR_DB_DIR = "/scratch/davised/lancedb"

def get_vector_db(db_path = Path(VECTOR_DB_DIR), hybrid: bool = True) -> VectorDb:
    db_path.mkdir(mode=0o750, parents=True, exist_ok=True)
    if hybrid:
        table_name = "mkdocs_docs_hybrid"
        search_type = SearchType.hybrid
    else:
        table_name = "mkdocs_docs"
        search_type = SearchType.vector

    return LanceDb(
        table_name=table_name,
        uri=db_path.as_posix(),
        embedder=get_embedder(),
        search_type=search_type,
    )


def get_storage_db(session_table="agent_sessions", knowledge_table="kb_contents") -> BaseDb:
    return SqliteDb(
        session_table=session_table,
        knowledge_table=knowledge_table,
        db_file="/scratch/davised/sessions.db",
    )

def get_knowledge() -> Knowledge:
return Knowledge(vector_db=get_vector_db(), contents_db=get_storage_db())- Agno supports many different types of databases for storage and for vectors
Checking Out the Code
Ingesting Knowledge
from .db import get_knowledge
from .reader.mkdocs import MkDocsReader

KB_PATH = "kb/mkdocs_content.json"

def update_docs_knowledge(kb_path=KB_PATH):
    reader = MkDocsReader(incremental=True)
    knowledge = get_knowledge()

    kb_path = kb_path

    knowledge.add_content(path=kb_path, reader=reader, upsert=True)

    # Need to implement deletions
    deleted_ids = reader.get_deleted_ids(kb_path)

    print("Knowledge base updated!")

if __name__ == "__main__":
    update_docs_knowledge()
Checking Out the Code
Getting an Agent
import logging
import os
from dotenv import load_dotenv
from agno.agent import Agent
from agno.models.vllm import VLLM
from agno.run.agent import RunOutput
from .db import get_knowledge
logging.basicConfig(level=logging.INFO, format='%(asctime)s - %(name)s - %(levelname)s - %(message)s')
logger = logging.getLogger(__name__)

load_dotenv()

model = os.getenv("LLM_MODEL", "")
api_key = os.getenv("LLM_BINDING_API_KEY", "")
host = os.getenv("LLM_BINDING_HOST", "")

def get_model() -> VLLM:
    return VLLM(id=model, api_key=api_key, base_url=host, temperature=0)

def get_docs_agent(stream: bool = True) -> Agent:
    logger.info("Agent model: %s", model)
    logger.info("Agent host: %s", host)
    return Agent(
        name="Docs Assistant",
        model=get_model(),
        stream=stream,
        introduction="You are an expert on the Wildwood HPC at Oregon State University Documentation Site. You were built by the Center for Quantitative Life Sciences (CQLS), including Ed Davis, Bioinformatics Manager.",
        role="Helpful HPC Documentation Assistant",
        expected_output=" ".join(
          [
            "Provide accurate answers based on the knowledge available from the website in the <references> section."
            "If you cannot determine an adequate answer, include 'Contact [Support](mailto:support@cqls.oregonstate.edu) for help outside this guide.' as part of your response.",
            "After providing an answer, include citations at the end of the response, when applicable. See the <citations> section for more details."
          ]
          ),
        additional_context=" ".join(
          [
            "<citations>You can find the title and url in the metadata of each reference. For example, if a reference has the following metadata:",
            "meta_data: {'url': 'https://docs.hpc.oregonstate.edu/cqls/connecting', 'title': 'Connecting', ...}",
            "You would cite it as: [Connecting](https://docs.hpc.oregonstate.edu/cqls/connecting).",
            "If multiple references are used, list them all at the end of your answer, e.g.:",
            "**References:**\n- [Title1](url1)\n- [Title2](url2)</citations>"
          ]
        ),
        knowledge=get_knowledge(),
        add_knowledge_to_context=True,
        search_knowledge=False,
        markdown=True
    )

def fix_markdown_spacing(run_output: RunOutput, **kwargs) -> None:
    """
    Agno post-hook to correct spacing in markdown links.

    Currently, the instructions in the additional_context are enough to resolve these issues.

    This function finds instances of "] (" and replaces them with "]("
    in the `content` attribute of the `run_output` object.

    Args:
        run_output: The output object from the agent run.
        **kwargs: Catches any other parameters passed by the hook runner.
    """
    if isinstance(run_output.content, str):
        # Perform the replacement on the content attribute
        run_output.content = run_output.content.replace("] (", "](")
Checking Out the Code
Serving the app
from agno.os import AgentOS
from agno.os.interfaces.agui import AGUI
from .agent import get_docs_agent
from dotenv import load_dotenv
from fastapi.middleware.cors import CORSMiddleware
import logging
import os

load_dotenv()

logging.basicConfig(level=logging.INFO)
log = logging.getLogger(__name__)

port = int(os.getenv("AGENT_OS_PORT", "7777"))

if dev_key := os.getenv("OS_DEV_KEY"):
    log.info("Using development security key for AgentOS.")
    os.environ["OS_SECURITY_KEY"] = dev_key

agent_os = AgentOS(
    id="cqls-hpc-website-kb-os",
    description="CQLS Wildwood HPC Documentation Assistant OS",
    agents=[get_docs_agent(stream=True)],
    interfaces=[AGUI(get_docs_agent())],
)

app = agent_os.get_app()

# Define the list of "origins" (websites) that are allowed to connect.
# You need your local dev server now, and you'll need your production domain later.
origins = [
    "http://localhost:5173",
    "http://localhost:43723",
    "http://10.224.64.50:43723",
    "http://web1.hpc.oregonstate.edu:43723",
    "https://docs.hpc.oregonstate.edu",
]

app.add_middleware(
    CORSMiddleware,
    allow_origins=origins,  # Allow specific origins
    allow_credentials=True,
    allow_methods=["*"],    # Allow all methods (GET, POST, etc.)
    allow_headers=["*"],    # Allow all headers (including Authorization)
)

if __name__ == "__main__":
    # Default port is 7777; change with port=...
    agent_os.serve(app="cqls_hpc_website_kb.app:app", reload=True, host="0.0.0.0", port=port)
What’s Next?
- Submit an issue ticket here because of discrepancies with native agent calling and those through the ag-ui interface
- Pending that result, the plan is to:
- Build a cli/tui interface to the knowledge base to confirm the logic and interface code
- Implementing a chat widget to chat with the documentation embedded in the
mkdocssite
- Long term goals:
- Query the DB to learn more about what can be improved, and what questions are inadequately resolved
- Add middleware for tracking commonly asked questions
- Add guardrails for limiting inputs and validating outputs
Can IBM Granite Answer questions?
YES
┏━ Response (114.1s) ━━━━━━━━━━━━━━━━━━━━━━━━━━━━━━━━━━━━━━━━━━━━━━━━━━━━━━━━━━━━┓
┃                                                                                ┃
┃ To connect to the Wildwood HPC cluster using SSH, follow these steps:          ┃
┃                                                                                ┃
┃  1 Generate an SSH Key (Optional but Recommended):                             ┃
┃     • On your local machine, generate an SSH key pair if you haven't already.  ┃
┃       This will allow you to log in without entering your ONID password every  ┃
┃       time.                                                                    ┃
┃     • Run the following command to generate an RSA SSH key:                    ┃
┃                                                                                ┃
┃        ssh-keygen -t rsa -b 4096                                               ┃
┃                                                                                ┃
┃     • Press Enter to accept the default file location (~/.ssh/id_rsa).         ┃
┃     • Optionally, enter a passphrase for added security.                       ┃
┃  2 Connect to the Wildwood HPC Cluster:                                        ┃
┃     • If you are on campus or connected to the VPN, use the following command  ┃
┃       to connect directly to the Wildwood HPC cluster:                         ┃
┃                                                                                ┃
┃        ssh hpc.cqls.oregonstate.edu                                            ┃
┃                                                                                ┃
┃     • Replace hpc.cqls.oregonstate.edu with the appropriate hostname if        ┃
┃       necessary.                                                               ┃
┃  3 Connecting from Off-Campus:                                                 ┃
┃     • If you are connecting from an off-campus location, you need to connect   ┃
┃       through a gateway machine called shell.hpc.oregonstate.edu.              ┃
┃     • Use the following command to connect:                                    ┃
┃                                                                                ┃
┃        ssh shell.hpc.oregonstate.edu                                           ┃
┃                                                                                ┃
┃     • Then, from the shell.hpc.oregonstate.edu machine, connect to the         ┃
┃       Wildwood HPC cluster:                                                    ┃
┃                                                                                ┃
┃        ssh hpc.cqls.oregonstate.edu                                            ┃
┃                                                                                ┃
┃  4 Using SSH Config for Simplified Connection:                                 ┃
┃     • For a more streamlined connection process, add the following lines to    ┃
┃       your ~/.ssh/config file:                                                 ┃
┃                                                                                ┃
┃        Host shell                                                              ┃
┃            HostName shell.hpc.oregonstate.edu                                  ┃
┃            User ONIDUSER                                                       ┃
┃            ControlMaster auto                                                  ┃
┃            ControlPath ~/.ssh/sockets/%r@%h-%p                                 ┃
┃            ControlPersist 600                                                  ┃
┃            TCPKeepAlive no                                                     ┃
┃            ServerAliveInterval 30                                              ┃
┃                                                                                ┃
┃        Host hpc                                                                ┃
┃            HostName hpc.cqls.oregonstate.edu                                   ┃
┃            User ONIDUSER                                                       ┃
┃            ProxyJump shell                                                     ┃
┃            ControlMaster auto                                                  ┃
┃            ControlPath ~/.ssh/sockets/%r@%h-%p                                 ┃
┃            ControlPersist 600                                                  ┃
┃            TCPKeepAlive no                                                     ┃
┃            ServerAliveInterval 30                                              ┃
┃                                                                                ┃
┃     • Replace ONIDUSER with your ONID username.                                ┃
┃  5 Accessing Files:                                                            ┃
┃     • For large file transfers, use files.hpc.oregonstate.edu.            ┃
┃     • Use sftp or scp to transfer files:                                       ┃
┃                                                                                ┃
┃        sftp files.hpc.oregonstate.edu                                     ┃
┃                                                                                ┃
┃     • For submitting jobs from the web to the infrastructure, use ssh and a    ┃
┃       CLI tool like wget or curl:                                              ┃
┃                                                                                ┃
┃        ssh files.hpc.oregonstate.edu wget https://...                     ┃
┃                                                                                ┃
┃                                                                                ┃
┃ References:                                                                    ┃
┃                                                                                ┃
┃  • Connecting to the Wildwood HPC cluster                                      ┃
┃  • New User 'onboarding' / FAQs                                                ┃
┃                                                                                ┃
┗━━━━━━━━━━━━━━━━━━━━━━━━━━━━━━━━━━━━━━━━━━━━━━━━━━━━━━━━━━━━━━━━━━━━━━━━━━━━━━━━┛- But it’s too slow for real-time on a single T4. We will need to use a more capable GPU for our LLM inference. Using 4 T4 with tensor parallelism provides a response 40s sooner, but that’s still too slow.
- The IBM Granite Micro LLM is a Dense 4B parameter model, and it seems good at summarizing content.
- The references at the bottom are returned as clickable links in the markdown output.
RAG Pipeline Development: Key Takeaways
The Challenge: Building modern AI applications requires integrating a complex web of libraries, models, and services. Managing the development environment and the operational workflow is a major hurdle.
Pixi’s Solution: Pixi acts as a unified toolchain for the entire software development lifecycle. By integrating with
pyproject.toml, it provides a standard Python development experience while handling the complex, mixed-dependency environment under the hood.From Development to Deployment:
pixi taskscreate a consistent and simple interface for complex operations like data ingestion and application serving. This makes the transition from a developer’s machine to a production server much smoother.- The same environment can be replicated on different machines, including local vs remote, making development more similar to production.
Next Steps
Adoption Strategy & Best Practices
Introducing a new tool works best with a deliberate, phased approach.
Recommendations for Research Groups:
- Start with a Pilot Project: Select one small, new project to learn the workflow without disrupting existing ones.
- Migrate Gradually: Convert existing environment.yml files as needed, rather than all at once.
- Hold a Hands-On Session: A short workshop can accelerate adoption for the whole team.
Our Experience at CQLS
We’ve used pixi to successfully build and validate over 250 software environments. Multiple research groups on our HPC have independently adopted it with positive results.
Conclusion: Reducing Barriers to Research and Improving Reproducibility
The goal is to provide researchers with more reliable and efficient options, allowing them to focus on their primary objectives.
Key takeaways:
- Modern environment managers can significantly reduce technical friction.
- True reproducibility requires deterministic, cross-platform dependency resolution.
- Performance improvements allow more time for science, less for system administration.
The Real Impact
The CQLS uses pixi to reduce the cognitive overhead of environment management, which improves our users’ ability to focus on science rather than installation issues.
Thank you - Questions?
- Email: ed@cqls.oregonstate.edu
- HPC Docs: https://docs.hpc.oregonstate.edu
- Pixi Docs: https://pixi.sh/latest
- vLLM: https://docs.vllm.ai/en/latest
- Agno: https://docs.agno.com
![]()
Oregon State University - 2025